Connecting My Baroni Lab Custom Amp

How do I connect my Baroni Lab Custom Amp?
We've been asked many times how to use and connect a Baroni Lab Custom Amp with all your personal equipment. There is a variety of ways to hook up your guitar, and the brains over at Baroni Lab have made sure all bases are covered. We made a few illustrations (for 4 possible setups) below to guide and help you out.
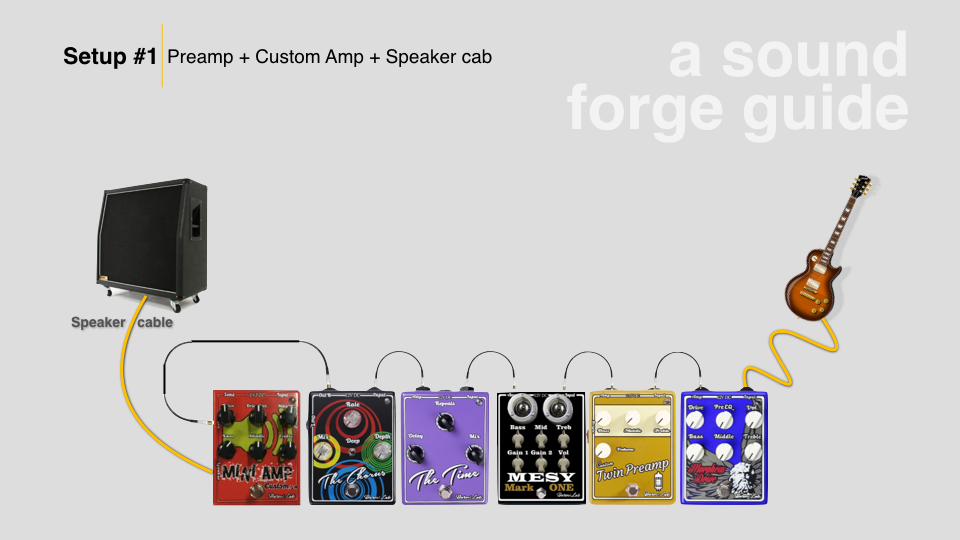
Setup #1 - Preamp pedal + Custom Amp + Speaker Cab
This illustrates how you can use a preamp pedal, use the Custom Amp's power amp section and plug directly to a cabinet. Here’s a pro tip, something to watch out for: make sure that you plug output of your preamp pedal to the Return socket of the Custom Amp. You may use your typical patch cable to connect them. You may even insert other pedals in the chain as long as the last pedal’s output is plugged to the Return socket. (What comes after that chain is another story all in itself.) Moving forward, you may connect your favourite cab via a speaker cable. Let me say that again, a SPEAKER CABLE. If you wanna know what’ll happen when you use an instrument cable as a speaker cable? Google it. :)
For full power, let’s hope you have a 4 Ohm cab available. Connecting an 8 Ohm cab will give you the power, while a 16 Ohm cab will reduce the power to a quarter. You may use any of the three impedance combinations, just be aware of the effect on the power output of the Custom Amp.
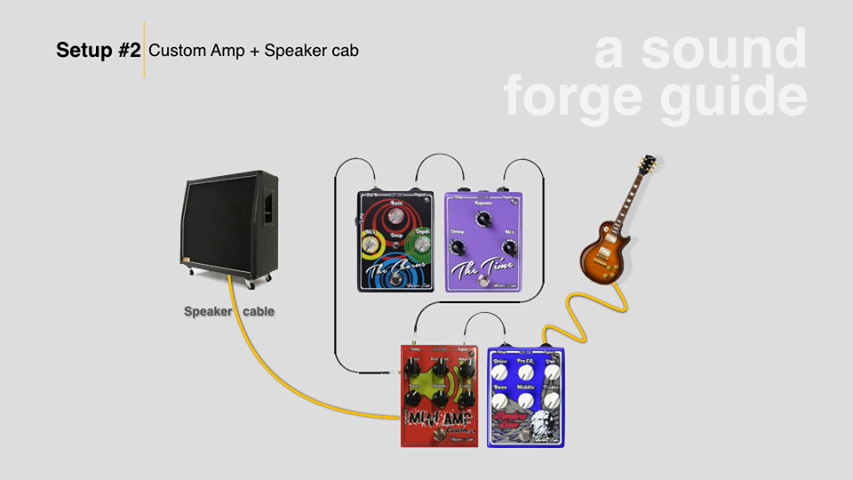
Setup #2 - Custom Amp + Speaker Cab
Setup#2 shows the full use of a Baroni Custom Amp's feature using both the Preamp and Power sections of the Custom Amp. Notice that the Send and Return sockets are not used here anymore. This opens the possibility of inserting your favourite time-based effects into the loop of the Custom Amp. You can even plug in your favourite looper or even a boost pedal. Because this set-up is using the ‘Speaker Out’ again, be wary of the cable you will use. Use a speaker cable.
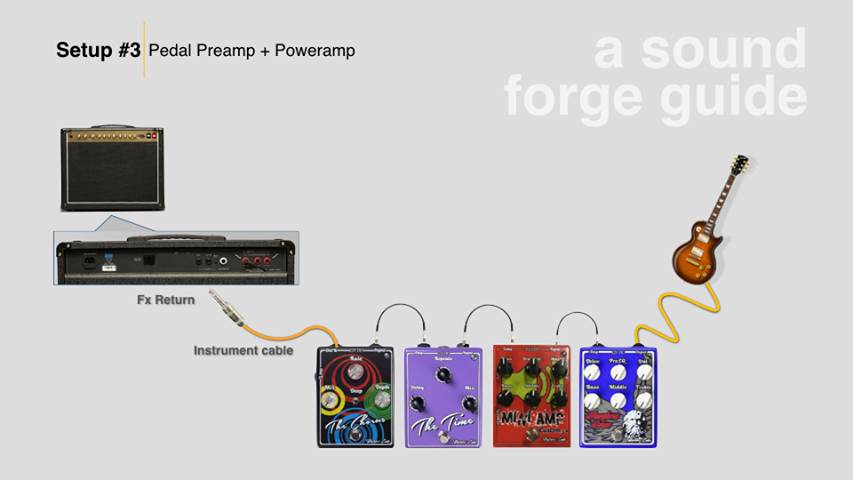
Setup #3 - Pedal Preamp + Poweramp
Setup#3 describes how we can use the Custom Amp's preamp section and bypassing an existing amp's preamp section by plugging directly to the Return of a combo. Quite useful if you prefer not to use a venue’s amp that may totally change your tone.
As opposed to the two previous setups, note here that you do not need to use a speaker cable anymore and it's up to you if you wish to turn on the cab sim or not. We say this because the Cab Sim option of the Custom Amp is simply there when your setup does not involve an actual guitar speaker, like for example - when you go directly to a mixing board or a PA. You may opt to turn the Cab Sim on anyway as an additional eq option.
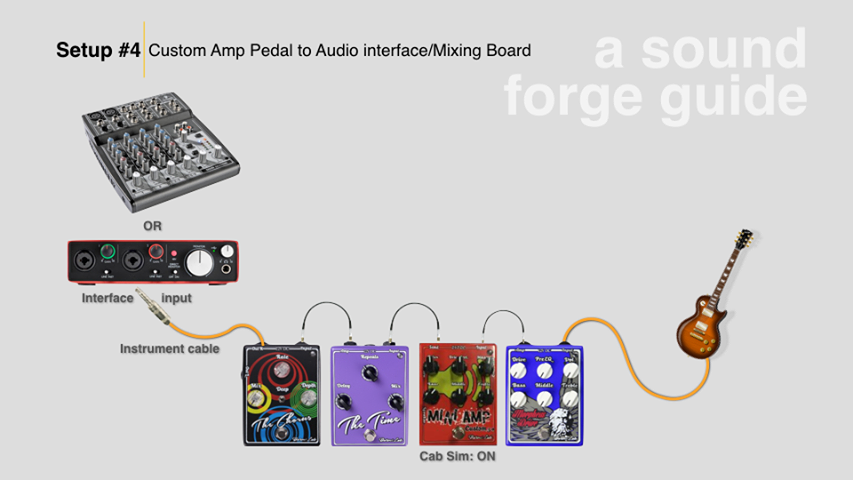
Setup #4 - Custom Amp Pedal to Audio interface/Mixing Board
Setup#4 illustrates how we can connect a Custom Amp to an audio interface. Likewise, you may also use this setup with a mixing board. Under this set-up, some helpful advice we can give are: a) Make sure you turn on the Cab Sim switch on your Custom Amp 50. b) Do use the DI Output in case you have the Custom Amp 100. c) You may use a TRS cable to connect to the audio interface/mixing board d) If you’ll be using a very long instrument cable at the output end of your pedal board, consider inserting a DI box and have an XLR ready to connect to your mixer/recording interface.
So, there you have it! Our two-cents worth into connecting your Baroni Lab Custom Amp. But hey, remember - the Custom Amp isn’t designed simply for these four set-ups. There are more ways to use the Custom Amp if you are willing to experiment (and, by all means, do!) We really hope these will be great help to you. If you have any questions or suggestions, please send us a message. Your feedback is welcome anytime. Thank you!
Leave a Comment